Azure Resource Provisioning
Due to the complexity of the possible cloud environment, it is almost impossible to create a script that works for all the cloud setup use cases. We have a quick start guide below that will facilitate this process.
Note: We strongly recommend to use the ARM template for deployment purposes as this document is not updated frequently and if you understand the risks and are more hands on then please proceed. You will have to do the configuration manually for it to work with feathr
Provision Azure Resources using CLI
- Use the content below as a detailed explanation of Azure resource provisioning script. DO NOT run that script directly given the complexity of cloud environment setup. Instead, follow the steps in this documentation so you can always go back and check your step in case of some failures.
- We provide an Azure resource provisioning script which can be used to automate the process
- Make sure you have sufficient permission for creating resources or add roles.
- Tailor this script based on the IT setup in your specific environment.
Prerequisites
This documentation assumes users have some basic knowledge of Azure. More specifically, users should:
- Have Azure-CLI installed
- Know where to get your Azure subscription ID. If you don’t, you should probably consult your IT admin, or someone in your team who used Azure before. Usually a subscription is shared across a department (such as one subscription for an application team and another subscription for an infrastructure team).
Cost of the setup
The cost of this demo setup should be minimal, given that all the resources used in this guide are either configured as automatically deleted (such as Synapse Spark cluster), pay-as-you-go (like Azure Storage), or with small scale (like Redis cluster).
Architecture
In this setup, we will setup the following account:
- Azure storage account (with Azure Data Lake Gen2) for offline store
- Azure Synapse Spark, for feature processing and to run Feathr runtime
- Azure Redis Cache for online store
- Azure Purview for feature registry (optional)
A more comprehensive setup is as below:
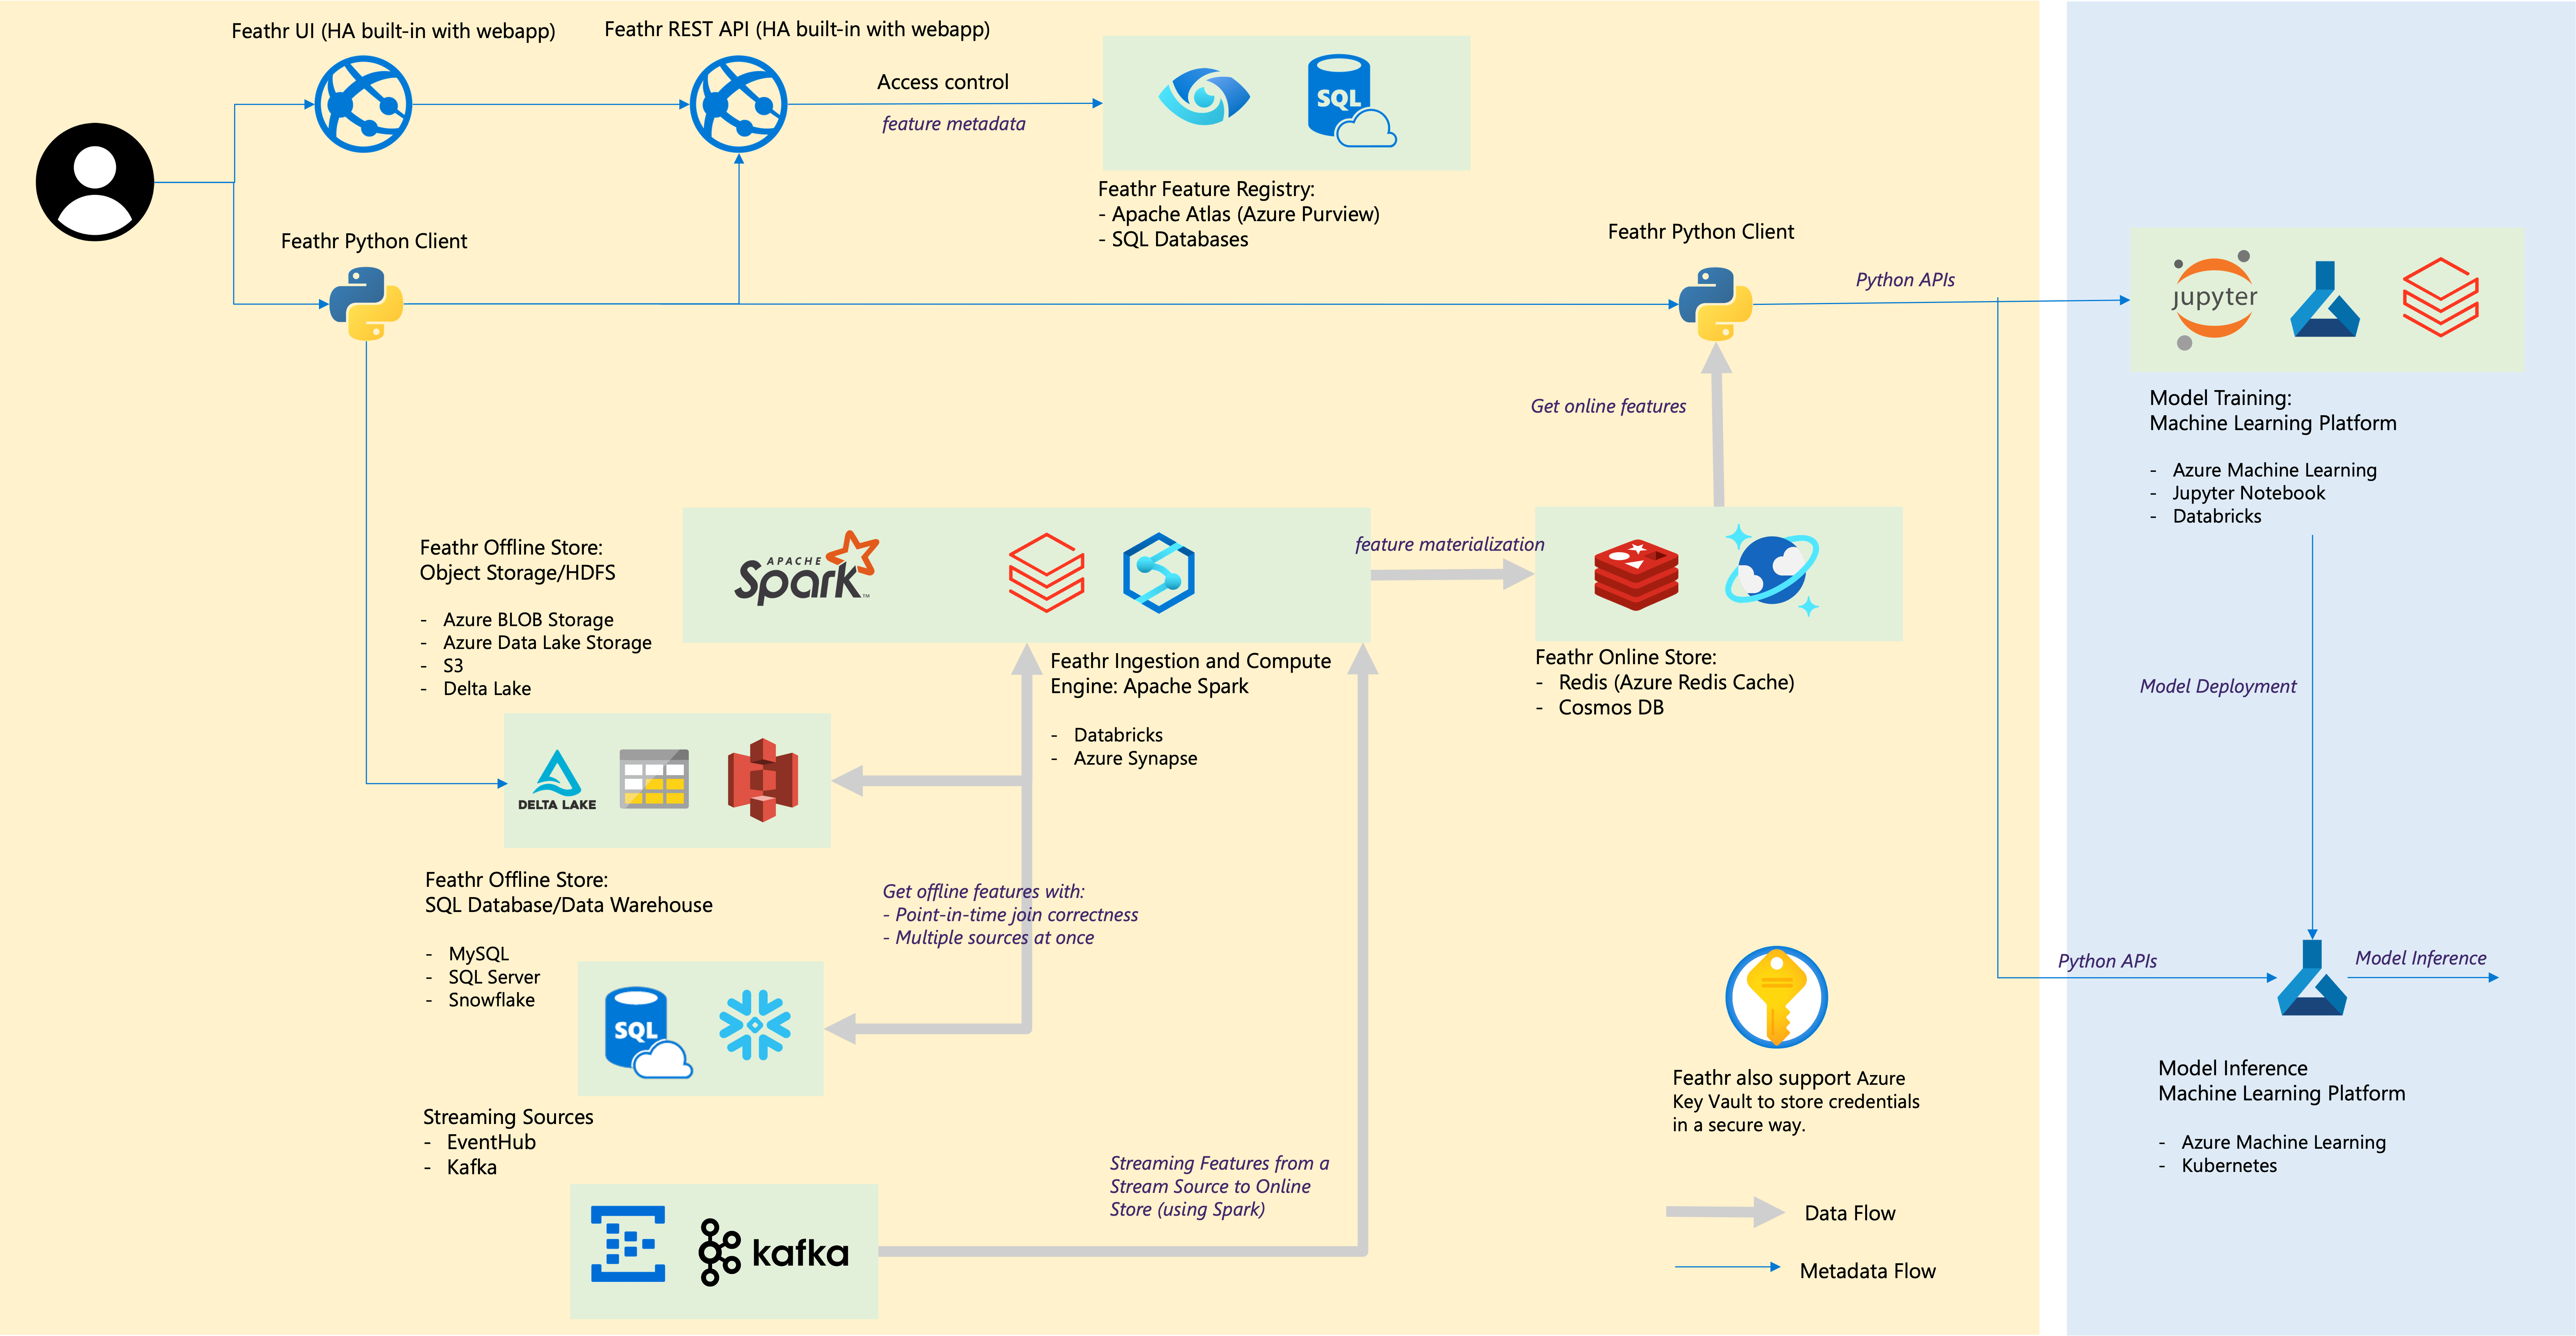
Name setup
Put in the name and password you want to use in the sections below. You can get the subscription ID and the location from your IT admins, and set all the other names based on your preference.
Note: please keep the resource_prefix short, since some of the Azure resources need the full name to be less than 24 characters. It’s recommended that to keep resource_prefix less than 15 characters.
subscription_id="{your_subscription_id}"
resource_prefix="feathrazuretest"
location="eastus2"
synapse_sql_admin_name="cliuser1"
synapse_sql_admin_password="{your_admin_password}"
synapse_sparkpool_name="spark31"
Login to Azure and set the corresponding subscription you want to work on
Please make sure you have the latest Azure CLI installed. You can do so by executing:
az upgrade --all true --yes
If you haven’t installed Azure CLI, follow the steps in this page to install Azure CLI: (https://aka.ms/azure-cli)[https://aka.ms/azure-cli]
if ! [ -x "$(command -v az)" ]; then
  echo 'Error: Azure CLI is not installed. Please follow guidance on https://aka.ms/azure-cli to install az command line' >&2
  exit 1
fi

# login if required
az account get-access-token
if [[ $? == 0 ]]; then
  echo "Logged in, using current subscriptions "
else
  echo "Logging in via az login..."
  az login
fi
Setup all the resource names
Setup all the resource names which will be used later.
service_principal_name="$resource_prefix-sp"
resource_group_name="$resource_prefix-rg"
storage_account_name="$resource_prefix"sto
storage_file_system_name="$resource_prefix"fs
synapse_workspace_name="$resource_prefix"spark
redis_cluster_name="$resource_prefix"redis
purview_account_name="$resource_prefix-purview"
And then set the current subscription ID:
az account set -s $subscription_id
Create a Service Principal which you can automate later
You can simply think an Azure Service Principal is an account that can be used for automation (so you don’t have to use your own account to perform all the actions), though it can do much more than that. We will use a service principal for the steps below, but you can also use your own Azure account for all those actions as long as you have sufficient permission.
# Create a resource group to group all the resources that will be used later
az group create -l $location -n $resource_group_name

sp_password=$(az ad sp create-for-rbac --name $service_principal_name --role Contributor --scopes /subscriptions/$subscription_id/resourceGroups/$resource_group_name --query "[password]" --output tsv)
sp_appid=$(az ad sp list --display-name $service_principal_name --query "[].{appId:appId}" --output tsv)
sp_tenantid=$(az ad sp list --display-name $service_principal_name --query "[].{appOwnerOrganizationId:appOwnerOrganizationId}" --output tsv)
echo "AZURE_CLIENT_ID: $sp_appid"
echo "AZURE_TENANT_ID: $sp_tenantid"
echo "AZURE_CLIENT_SECRET: $sp_password"
This will give three variables: AZURE_CLIENT_ID, AZURE_TENANT_ID and AZURE_CLIENT_SECRET. You will need them later.
Note: You should save AZURE_CLIENT_SECRET because you will only see it once here
Create a storage account
Next, we need to:
- create an Azure Storage Account with Azure Data Lake Gen2 enabled
- create a default container
- assign the Service Principal we just created to the
Storage Blob Data Contributorrole to this storage account, so it can upload and download files accordingly.
az storage account create --name $storage_account_name  --resource-group $resource_group_name --location $location --enable-hierarchical-namespace

az storage fs create -n $storage_file_system_name --account-name $storage_account_name

az role assignment create --role "Storage Blob Data Contributor" --assignee "$sp_objectid" --scope "/subscriptions/$subscription_id/resourceGroups/$resource_group_name/providers/Microsoft.Storage/storageAccounts/$storage_account_name"
Create a Synapse cluster
Next, we need to create an Azure Synapse Workspace. You can learn more about Azure Synapse in the documentation page. In a nutshell, in a Synapse Workspace, you can get a managed Apache Spark Pool which you can stop at anytime, as well as an enterprise datawarehouse.
The script below helps you to:
- Create a Synapse Workspace
- Create a Synapse Spark Pool
- Assign the right permission to this Spark Pool
# Create Synapse Cluster
az synapse workspace create --name $synapse_workspace_name --resource-group $resource_group_name  --storage-account $storage_account_name --file-system $storage_file_system_name --sql-admin-login-user $synapse_sql_admin_name --sql-admin-login-password $synapse_sql_admin_password --location $location

az synapse spark pool create --name $synapse_sparkpool_name --workspace-name $synapse_workspace_name  --resource-group $resource_group_name --spark-version 2.4 --node-count 3 --node-size Medium --enable-auto-pause true --delay 30

# depending on your preference, you can set a narrow range of IPs (like below) or a broad range of IPs to allow client access to Synapse clusters
external_ip=$(curl -s http://whatismyip.akamai.com/)
echo "External IP is: ${external_ip}. Adding it to firewall rules"
az synapse workspace firewall-rule create --name allowAll --workspace-name $synapse_workspace_name --resource-group $resource_group_name --start-ip-address "$external_ip" --end-ip-address "$external_ip"

# sleep for a few seconds for the change to take effect
sleep 2
az synapse role assignment create --workspace-name $synapse_workspace_name --role "Synapse Contributor" --assignee $service_principal_name
Alternatively, you can use your Azure account (“User Principal Name”) like below:
az synapse role assignment create --workspace-name $synapse_workspace_name --role "Synapse Contributor" --assignee "username@contoso.com"
Optional: You can verify if the role assignment is successful or not: (it will list the roles like below):
echo "Verify if the assignment is successful or not:"
az synapse role assignment list --workspace-name $synapse_workspace_name  --assignee $service_principal_name
{
  "id": "c113807f-057a-403f-9b61-192b680e0e07",
  "principalId": "3e5dcd0c-5fd1-4600-adf8-0dde3abd3ea1",
  "principalType": "ServicePrincipal",
  "roleDefinitionId": "7572bffe-f453-4b66-912a-46cc5ef38fda",
  "scope": "workspaces/feathrtestsynapse"
}
Configurure Redis Cluster
We will use Redis as on online store. Below is the command to create Redis with Basic SKU and with a small VM size for demo purpose.
This config is only for demo purpose. For production scenario, you should consider:
- using a Premium SKU with larger VM
- enable multiple zones
- use more replicas Please refer to the article Enable zone redundancy for Azure Cache for Redis for more information on enabling zone redundancy.
You should also record the password which will be used later.
echo "Creating Redis Cluster..."
az redis create --location $location --name $redis_cluster_name --resource-group $resource_group_name  --sku Basic --vm-size c0 --redis-version 6

# Alternatively for production setting you can use the template below:

# az redis create --location $location --name $redis_cluster_name --resource-group $resource_group_name  --sku Premium --vm-size p5 --redis-version 6 --replicas-per-master 3 --zones 1 2 3

echo "Record this Redis Key which you will use later:"
redis_password=$(az redis list-keys --name $redis_cluster_name --resource-group $resource_group_name  --query "[primaryKey]" --out tsv)
echo "REDIS_PASSWORD: $redis_password"
Configure Purview Account (optional)
Azure Purview will be used here for feature registry and feature sharing. The code below will create a Purview Account.
echo "creating purview account"
az extension add --name purview
az purview account create --location $location --account-name $purview_account_name --resource-group $resource_group_name
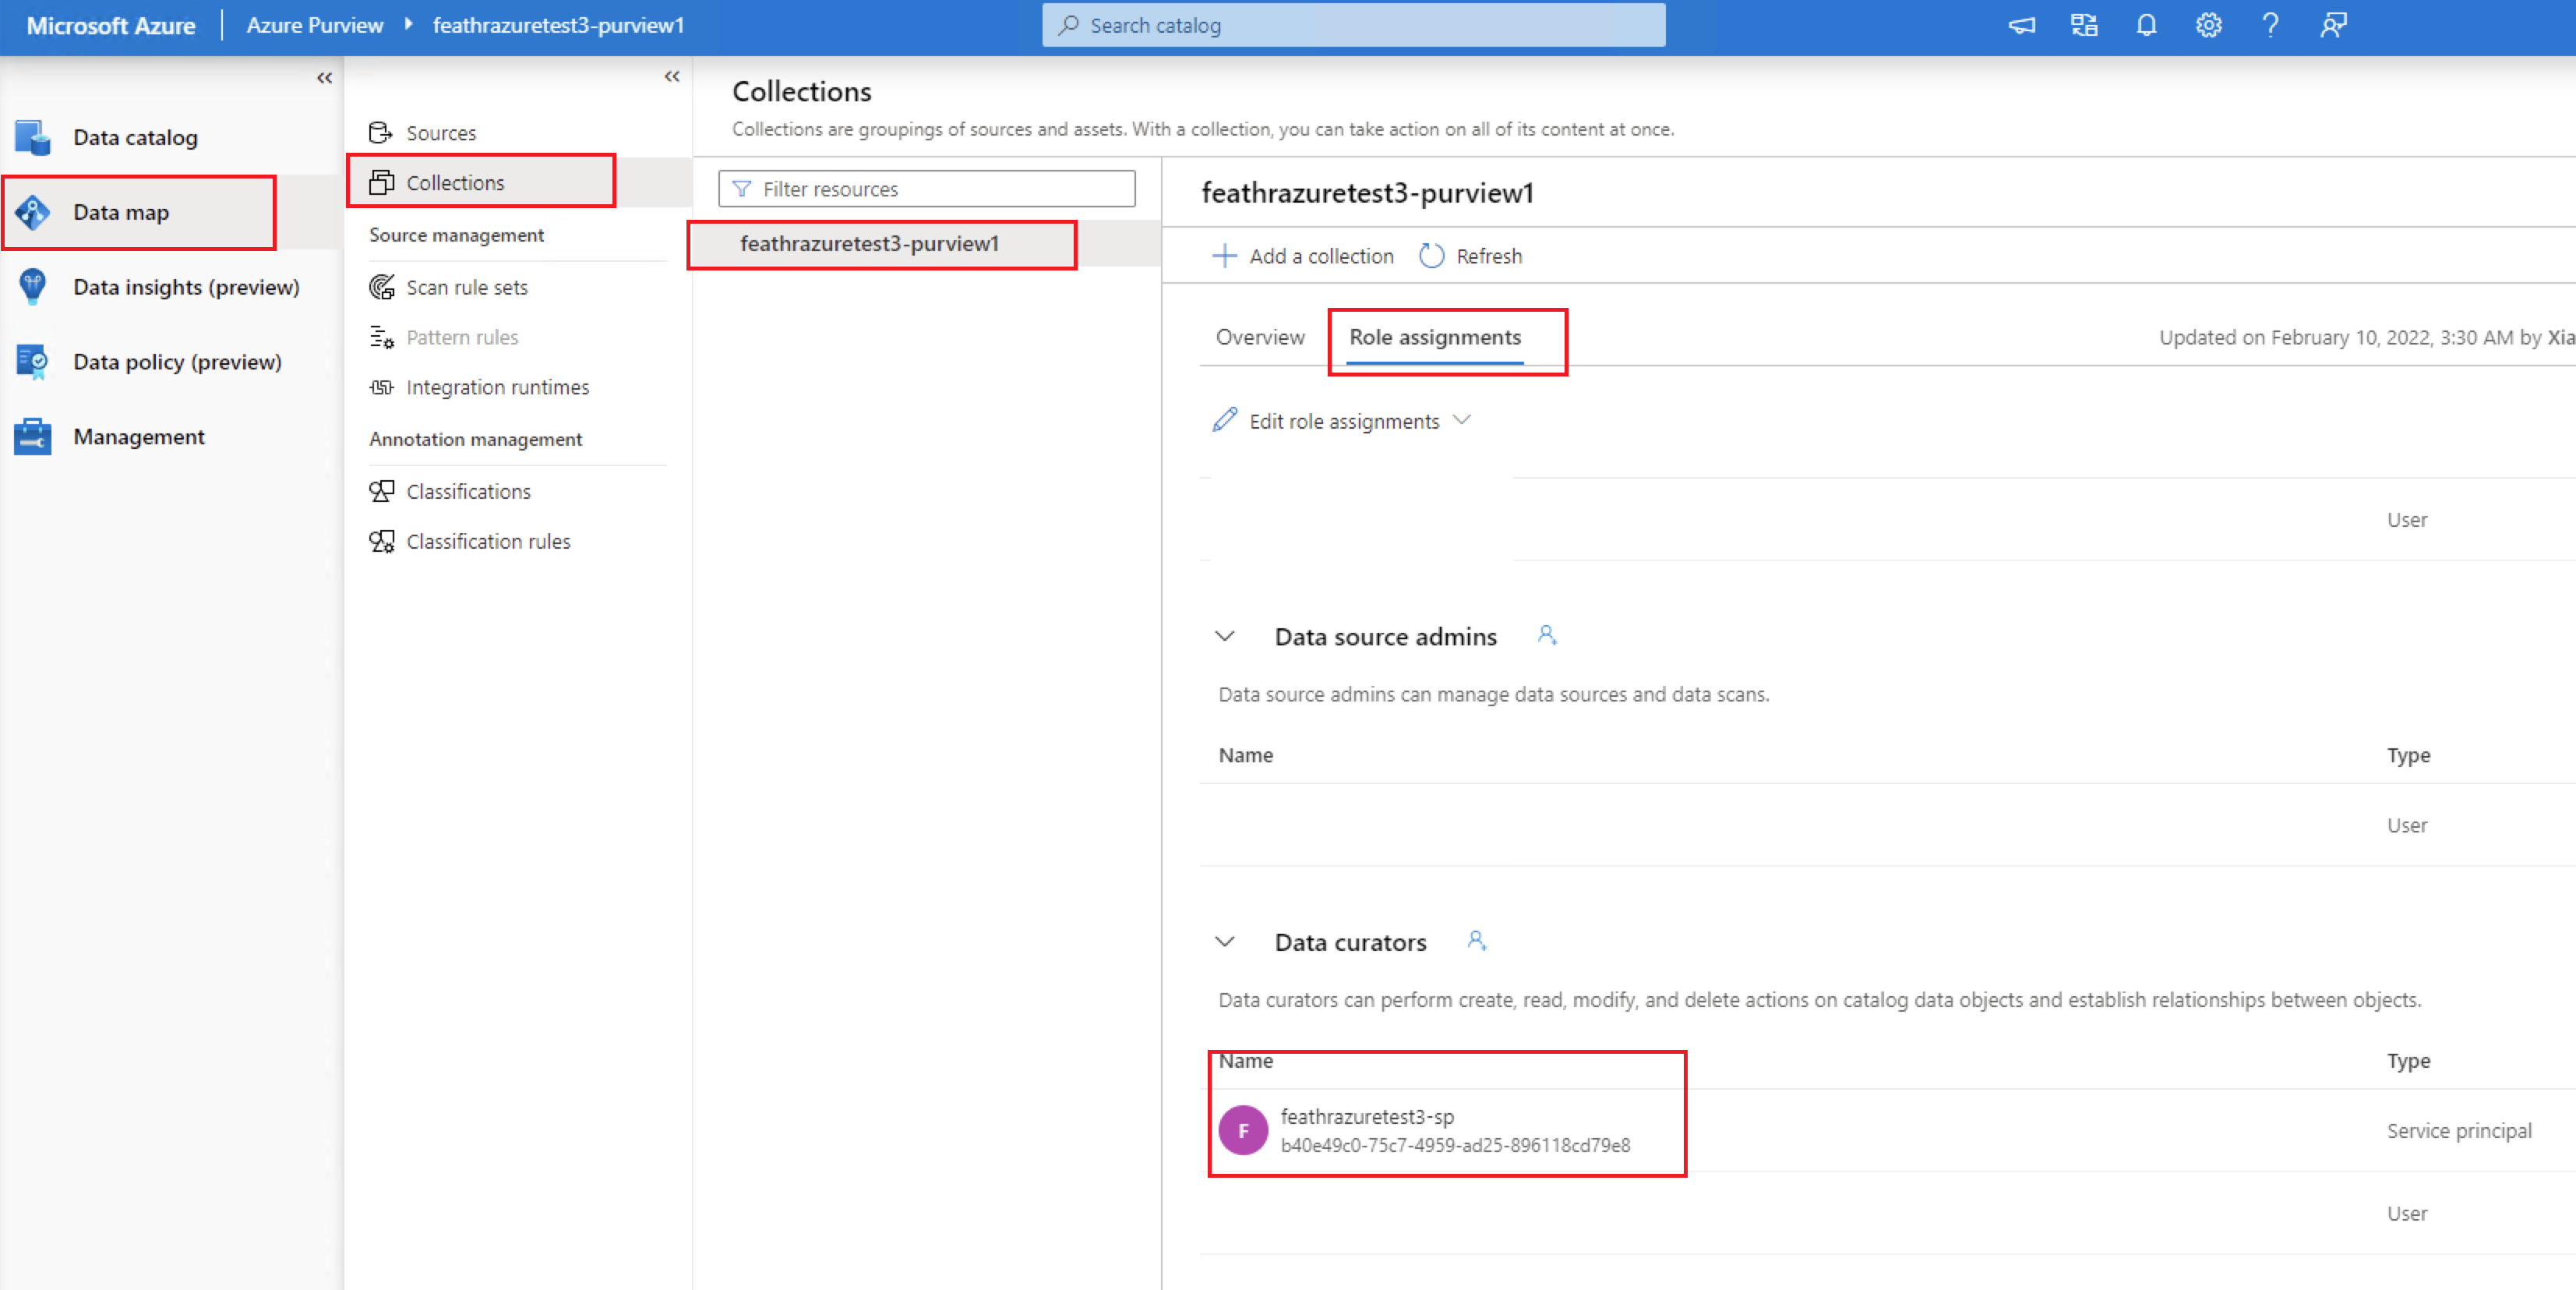
You should also grant the service principal the Data Curator to your Purview collection manually. For more details, please refer to Access control in Azure Purview documentation
Upload demo data
This is completely optional. It will download NYC Taxi Driver data and upload it to the default storage account, to make the setup experience smoother.
See more details on the raw dataset from the TLC Trip Record Data webpage:
echo "preparing demo data"
wget -O /tmp/green_tripdata_2020-04.csv https://s3.amazonaws.com/nyc-tlc/trip+data/green_tripdata_2020-04.csv
az storage fs file upload --account-name $storage_account_name --file-system $storage_file_system_name --path demo_data/green_tripdata_2020-04.csv --source /tmp/green_tripdata_2020-04.csv --auth-mode account-key
Deleting all resources (Optional)
You can optionally delete all the resources based on the policy of your organization, like below:
az group delete -n $resource_group_name --yes
az ad sp delete --id $sp_objectid